


WHAT IS A MICROSOFT AZURE SUPPORT PLAN?
Microsoft Azure offers a range of support plans to meet the needs of different customers. The support plans include:
1. Basic Support: This plan provides access to Azure documentation, whitepapers, and support forums. It's a self-service option with no guaranteed response time for support requests.
2. Developer Support: This plan is designed for developers and offers email support with a 12-hour response time during business hours. It also includes core support for billing and subscription management.
3. Standard Support: This plan provides business-critical support with a 24/7 response time for critical issues. It includes access to technical experts, proactive monitoring, and a guaranteed response time for support requests.
4. Professional Direct Support: This is a higher-tier plan with faster response times and direct access to Azure engineers. It's suitable for mission-critical applications.
5. Premier Support: This is a customized support plan for large enterprises with complex needs. It offers personalized support, a dedicated Technical Account Manager (TAM), and more.
Please note that Azure's offerings and pricing can change over time, so I recommend visiting the official Microsoft Azure website or contacting Microsoft directly for the most up-to-date information on their support plans and pricing.
COMPARING MICROSOFT AZURE SUPPORT PLAN:
Comparing Microsoft Azure support plans can help you choose the one that best fits your organization's needs. Here's a general comparison of the key features and differences between Azure support plans.
1. Basic Support:
- Self-service access to documentation and forums. - No guaranteed response time for support requests.
2. Developer Support:
- Email support with a 12-hour response time during business hours. - Core support for billing and subscription management.
3. Standard Support:
- 24/7 access to technical support with a guaranteed response time. - Assistance with critical issues. - Proactive monitoring and support for production workloads.
4. Professional Direct Support:
- Faster response times than Standard Support. - Direct access to Azure engineers for technical issues. - Suitable for mission-critical applications.
5. Premier Support:
- Highly personalized support with a dedicated Technical Account Manager (TAM). - Customized solutions and proactive services. - Best for large enterprises with complex needs.
The choice between these plans depends on factors such as the criticality of your workload, your organization's size, and your budget. It's essential to assess your specific requirements and consider factors like response times, the level of expertise needed, and the extent of personalized support.
Please note that Azure's offerings and pricing can change, so I recommend checking the Azure website or contacting Microsoft for the most current information and any new plans that may have been introduced since my last update.
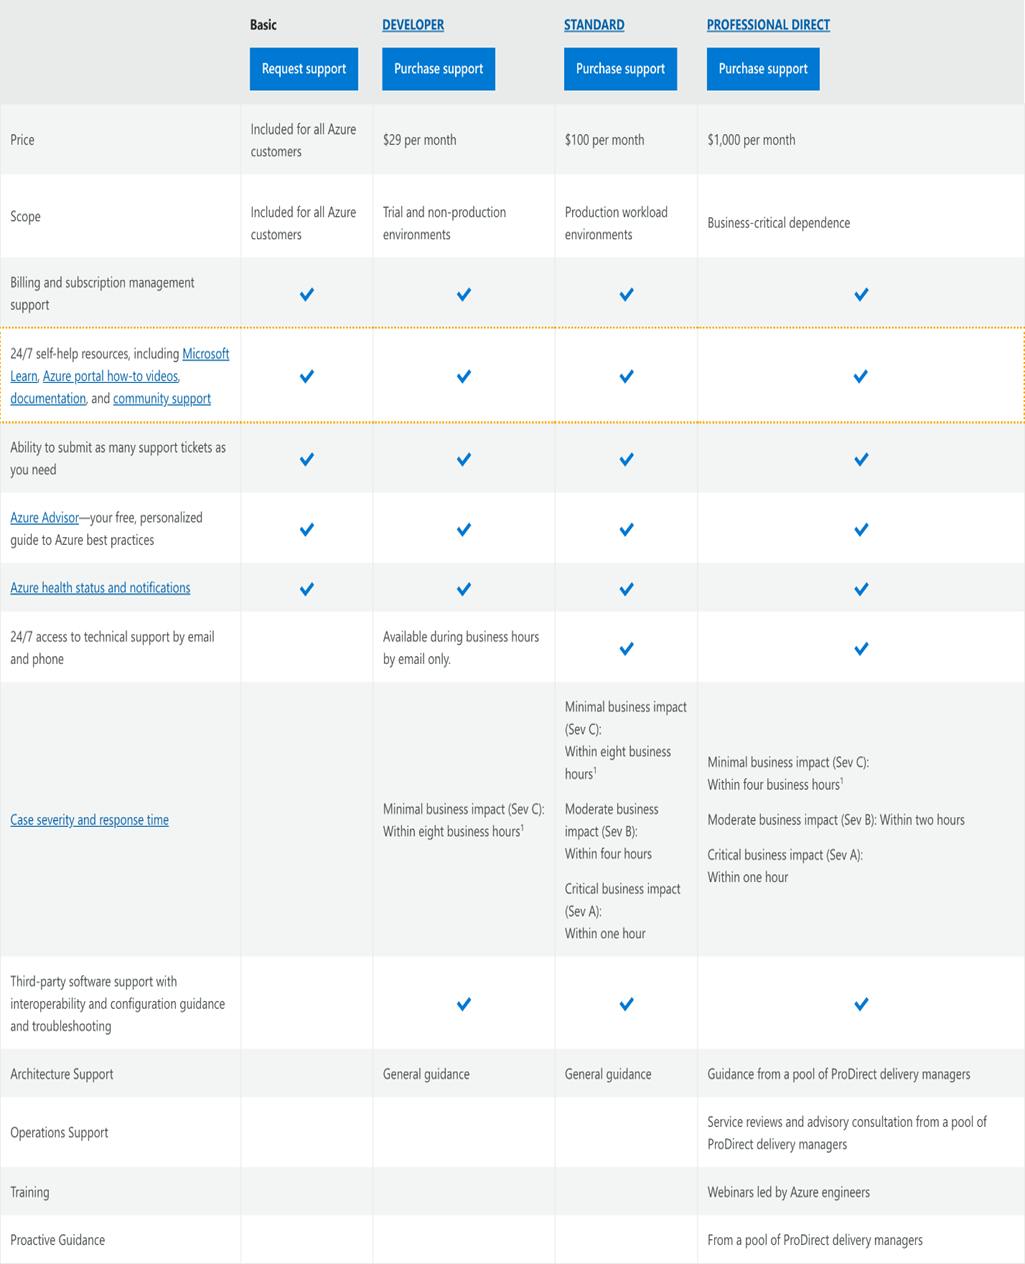
COMPARE AZURE SUPPORT PLANS CHART:
A.

B.
C.

Azure enables you to create and manage support requests, also known as support tickets. You can create and manage requests in the Azure portal. You can also create and manage requests programmatically, using the Azure support ticket REST API, or by using Azure CLI.
You can get to Help + support in the Azure portal. It's available from the Azure portal menu, the global header, or the resource menu for a service. Before you can file a support request, you must have appropriate permissions.
Azure role-based access control [RBAC].
You must have the appropriate access to a subscription before you can create a support request for it. This means you must have the Owner, Contributor**, or Support Request Contributor role**, or a custom role with Microsoft Support at the subscription level.
To create a support request without a subscription, for example, an Azure Active Directory scenario, you must be an Admin.
NOTE:
If a support request requires investigation into multiple subscriptions, you must have the required access for each subscription involved (Owner, Contributor, Reader, Support Request Contributor, or a custom role with Microsoft.Support/support/read permission).
A more detailed practical approach to triggering Azure Support Plan requests is well explained below as we cover these key vital steps. [Let’s navigate].
1). Create Azure Help+Support Request.
Let’s dwell on the basic prerequisite needed first before going through the steps listed above for the creation of an Azure Support Request/Ticket.
PREREQUISITE
1). Your PC with online access.
2). Microsoft Azure account - If you don't have an Azure paid subscription, create a Free Account before you begin.
3). The Azure portal URL is specific to the Azure cloud where your organization is deployed.
A). Azure portal for commercial use is: portal.azure.com
B). Azure portal for the United States government is: portal.azure.us
Azure provides unlimited support for subscription management, which includes billing, quota adjustments, and account transfers. For technical support, you need a support plan. For more information, see Compare support plans on the above chart as a guide.
Follow the below steps to create an Azure Support Request.
STEP 1: CREATE AZURE HELP + SUPPORT REQUEST.
Login to your local machine [PC].
We can raise an Azure Help + Support request/ticket through the global header or Resource bar in the Azure portal.
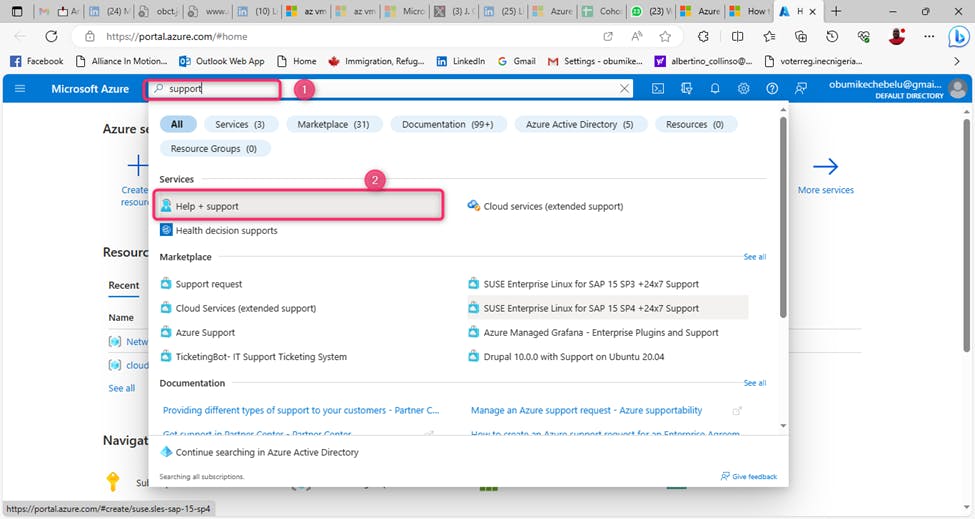
1). Launch the Azure portal for commercial use is: portal.azure.com Input Help + support on the search bar [Global header].
2). Select Create a support request.

Go to “Help + support” from a resource menu
To start a support request in the context of the resource you're currently working with:
1). From the resource menu, in the Support + troubleshooting section, select New Support Request. When you start the support request process from a resource, some options are pre-selected for you, based on that resource.

Both options above of using either Global header search and Resource bar in the Azure portal will lead you to create a support request. When you start the support request process from a resource bar, some options are pre-selected for you, based on that resource. Whereas, its not use a global header search.
Our article will be based on navigating the Azure Portal to create a support + help plan ticket/request through a global header.
On the Windows dashboard / Global header, search "Support", and select "Help + Support". Then select “+Crate a Support request” This will launch you on the sequential pages starting from "Problem Description", “Recommended Solution”, “Additional Details” and “Review+Create” pages. Successful validation after a review triggers the Create command for the support request to be created. A successful Help+Support request message will redirect you to all support requests.
Do follow the steps below for a guide to create an Azure Support Request.
1). Launch the Azure portal for commercial use is: portal.azure.com Input Help + support on the search bar [Global header].

2). Select Create a support request.
A.

B.
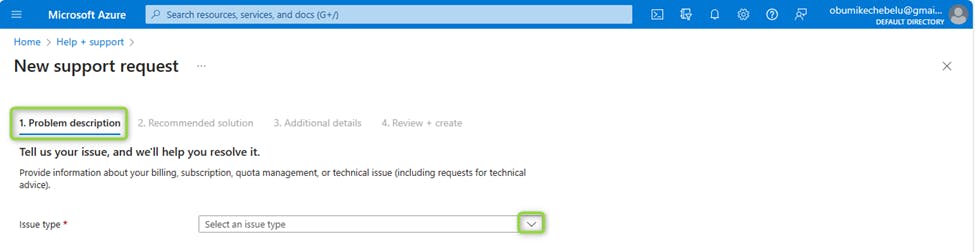
Problem description
The first step of the support request process is to select an issue type. You'll then be prompted for more information, which can vary depending on what type of issue you select. If you select Technical, you'll need to specify the service that your issue relates to. Depending on the service, you'll see additional options for Problem type and Problem subtype. Be sure to select the service (and problem type/subtype if applicable) that is most related to your issue. Selecting an unrelated service may result in delays in addressing your support request.
NOTE
In most cases, you'll need to specify a subscription. Be sure to choose the subscription where you are experiencing the problem. The support engineer assigned to your case will only be able to access resources in the subscription you specify. The access requirement serves as a point of confirmation that the support engineer is sharing information with the right audience, which is a key factor for ensuring the security and privacy of customer data.
If the issue applies to multiple subscriptions, you can mention additional subscriptions in your description, or by sending a message later. However, the support engineer will only be able to work on subscriptions to which you have access. If you don't have the required access for a subscription, we won't be able to work on it as part of your request.
3). On the Problem Description page, Select the issue type [Billing for example] and input other required data.

4). Select the right Azure Subscription, Describe the Issue on the Summary [Type in the issue] and select the problem type. Once you've provided all of these details, select Next.
Summary: "A charge discount request on my subscription while as a student of Hagital Nigeria, learning Azure cloud as my free subscription has exhausted".
NOTE*
The system will help you choose the right wordings for your issues while describing your issues in the summary. Also, the selection of the problem type must reflect the issue described in the summary. All have to be in a sink.

5). Select the problem subtype and click Next.

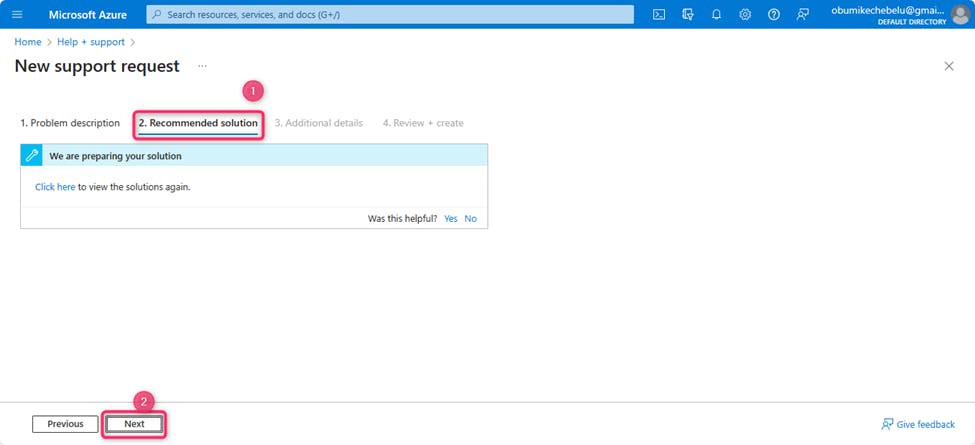
Recommended solution:
Based on the information you provided, we'll show you recommended solutions you can use to try and resolve the problem. In some cases, we may even run a quick diagnostic. Solutions are written by Azure engineers and will solve the most common problems.
If you're still unable to resolve the issue, continue creating your support request by selecting Return to support request, and then selecting Next.
6). Select Next to Additional Details if the solution did not resolve the problem.
A.

B.
Additional details
We collect additional details about the problem. Providing thorough and detailed information in this step helps us route your support request to the right engineer.
1). Complete the Problem details so that we have more information about your issue. If possible, tell us when the problem started and any steps to reproduce it. You can optionally upload one file or browser trace for more details of the issue.
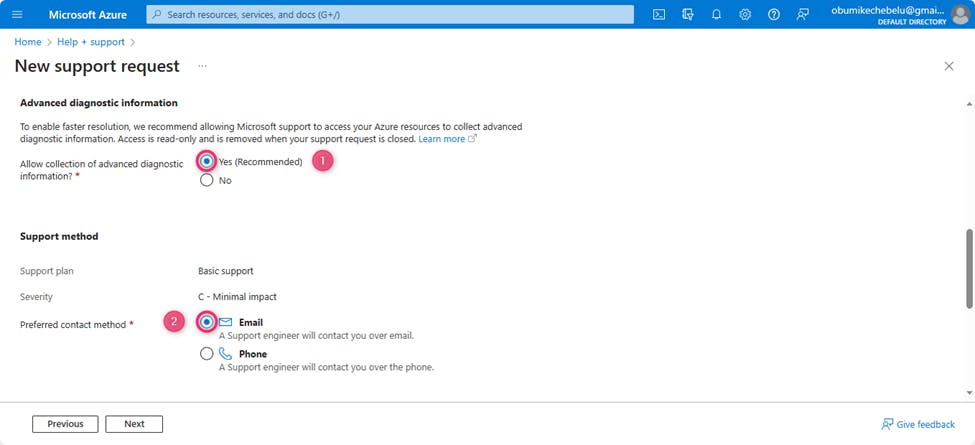
2). In the Advanced diagnostic information section, select Yes or No. Selecting Yes allows Azure support to gather advanced diagnostic information from your Azure resources. If you prefer not to share this information, select No. See the Advanced diagnostic information logs section for more details about the types of files we might collect.
In some cases, there will be additional options to choose from. For example, for certain types of Virtual Machine problem types, you can choose whether to allow access to a virtual machine's memory.
3). In the Support method section, select the Severity level, depending on the business impact. The maximum available severity level and time to respond depends on your support plan.
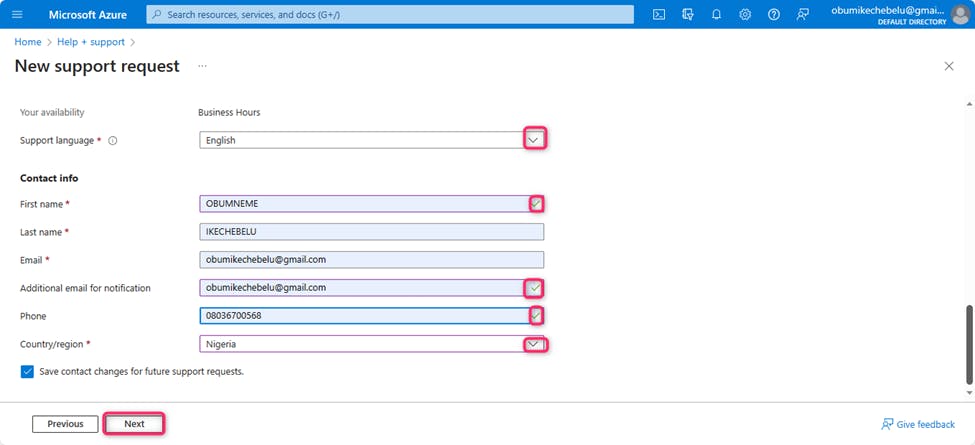
4). Provide your preferred contact method, your availability, and your preferred support language.
5). Complete the Contact info section so that we know how to reach you.
Select Next when you've completed all of the necessary information.
7). On problem details, input the exact time or click not sure, input your subscription ID and give full details of the problem.

Describe your problem, providing as much detail as possible:
A charge discount request on my subscription while as a student of Hagital Consulting Nigeria, learning Azure cloud Technology as my free subscription has exhausted.
Sir, continuous practical learning on Azure Cloud enables me to understand your cloud technology which is of great interest and concern to me.
I subscribe for Pay as you go with full knowledge of customer agreement since I do not have a free subscription anymore.
Please sir, I humbly request to be considered for a free subscription or a quality discount on my subscription.
I count on your maximum cooperation.
Thanks,
8) On advanced diagnosis information, select Yes and on support method-preferred contact method, select Email.
9). Input your contact details and click Next.
10). On Review+Create, inputted data will be validated. Next, Select Create. A successful support request will be created.

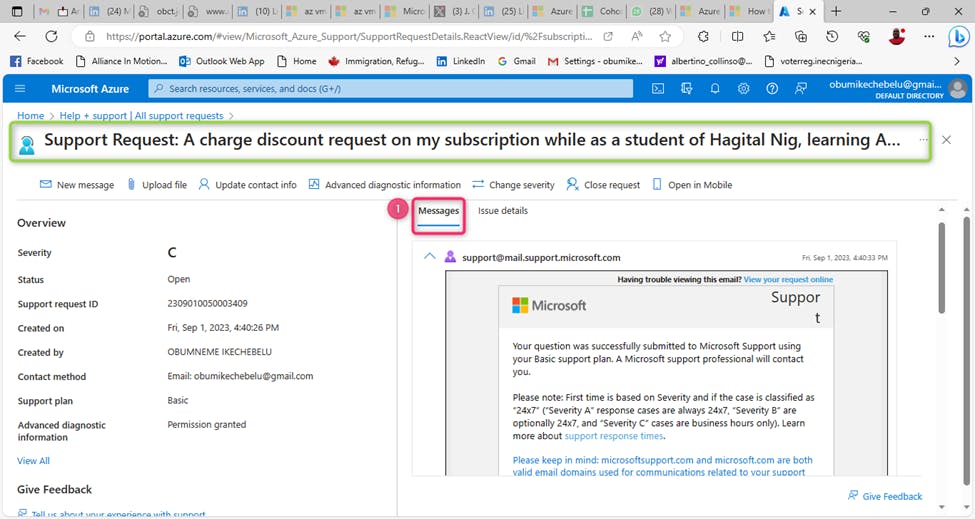
11). Go to Help + Support to verify your created support request through all supports request. Select the right support request.

12). A HELP+SUPPORT REQUEST created successfully. Do expect a feedback mail from Microsoft Azure.
SUMMARY:
We were able to successfully explore the following Azure Cloud journey and I am confident that you can navigate on your own through the above guide made easy in the areas below;
1). Create a support plan request in Azure.
Thank You!...