


Table of contents


No headings in the article.
Azure storage is one of the cloud computing PaaS (Platform as a Service). A storage account in Azure is a resource that holds a collection of Azure Storage data objects/services, such as Azure blobs, Azure file shares, Azure queues, Azure tables, and Azure disks. The storage account provides a unique namespace for accessing the data from anywhere in the world over HTTP or HTTPS, which is highly available, secure, massively scalable, durable and redundant.
What is Azure Blob Storage?
Blob Storage is a virtual container that is optimized for storing massive amounts of unstructured data, such as videos, pictures, documents, text or binary data.
Blob Storage is ideal for:
1. Serving images or documents directly to a browser. 2. Storing files for distributed access. 3. Streaming video and audio. 4. Storing data for backup and restore disaster recovery, and archiving. 5. Storing data for analysis by an on-premises or Azure-hosted service.
In Blob storage, your files are organized into containers called blobs and Users or client applications can access blobs via URLs, the Azure Storage REST API, Azure PowerShell, Azure CLI, or Azure Storage.
A more detailed practical approach to creating an Azure Storage account – Blob storage [Let’s navigate].
1. Create a Storage account.
Let’s dwell on the basic prerequisite needed first before going through the steps listed above for the creation of an Azure Storage account – Blob storage.
PREREQUISITE
1. Your PC with online access. 2. Microsoft Azure account - If you don't have an Azure paid subscription, create a Free Account before you begin.
Follow the below steps to create an Azure Storage Account.
STEP 1: CREATE A STORAGE ACCOUNT
- log in to https://portal.azure.com/ from your PC.
On the Windows dashboard, choose "Create a resource", and click "Storage". Now, choose "Storage Account". Then select “+Crate” This will launch you on the sequential pages starting from "Basics", “Advanced”, “Networking”, Data Protection”, Encryption”, Tags” and “Review” pages. Successful validation after a review triggers Create command for application deployment.

SELECT CREATE

2. On the “Basic” page, input the details for fields - choose the subscription, resource group, storage name, location, performance, account type, replication and access tier. Let's navigate, one by one as in the below image.

Azure subscription is an agreement with Microsoft to use Microsoft cloud platforms or services. And the charges are based on either a per-user license fee or on cloud-based resource consumption. So, select your appropriate subscription. It will be billed for the services in the account.
- Under project details, click on the drop-down arrow to select any of your existing Azure subscriptions.
A resource group contains the resources required for the successful deployment of your Service in Azure. It is a container that holds related resources for an Azure solution.
- Under Resource Group, choose your existing Resource Group name or click on “create new” and input the unique name for the RESOURCE GROUP [RG] to be created.

Under Storage account name - Input your storage account name [It must be unique, It must be between 3 and 24 characters in length and may contain numbers and lowercase letters only].
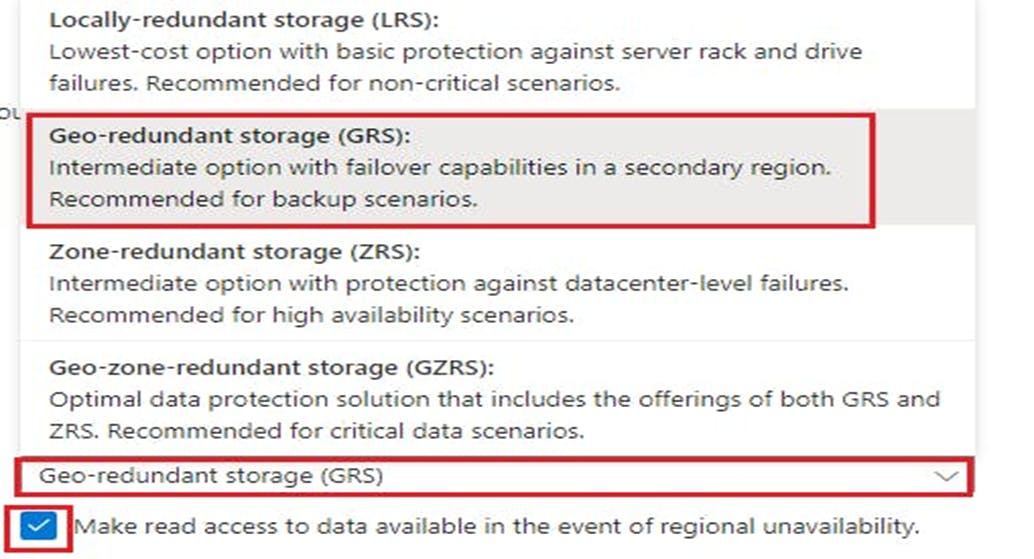
At the Region, a drop-down arrow for you to select the right redundancy that meets the subject aim.

On the Performance,
Performance determines the data services you can have in your storage account and the type of hardware disks used to store the data.
1. Standard allows you to have any data service (Blob, File, Queue, Table) and uses the traditional hard disk. 2. Premium limits you to one specific type of blob called a page blob and storing unmanaged virtual machine disks. It uses Solid - State Drives (SSD) for faster access.
- Under Performance – Select “Standard”
Click on: “Next: Advance”
- On the “Advance” page, tick allow cross-tenant replication for the Blob storage section.
On Access tier
Azure Storage provides different options for accessing data services based on usage patterns. This setting is used for Blob storage only.
Hot Access Tier is used for frequently accessed data in the storage account. It's the most cost-effective. By default, we chose the hot tier.
Cool Access Tier is used for infrequently accessed data in the storage account. It's optimized for storing large amounts of data.
- On the Access tier click on "hot" to frequently access your data at any time.

Click on “Next: Networking” to configure your networking.
On the “Networking” page - Network access – Enable public access for all Networks [Storage URL can be accessed over the internet when public access is enabled and if disable public access is ticked, private access is enabled as access is to you alone].
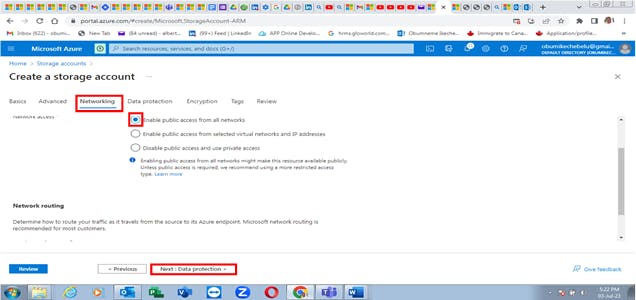
Click on “Next: Data Protection” to configure for Data Recovery.
On the Data protection page, leave it in its default state. The purpose of this page is to retrieve your deleted storage within a minimum retention period of 7 days.
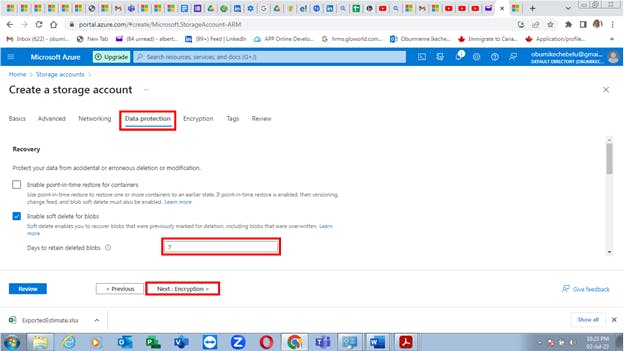

Click on “Next: Encryption” to configure for Encryption service type.
- On the “Encryption” page, leave all on its default state unless otherwise.
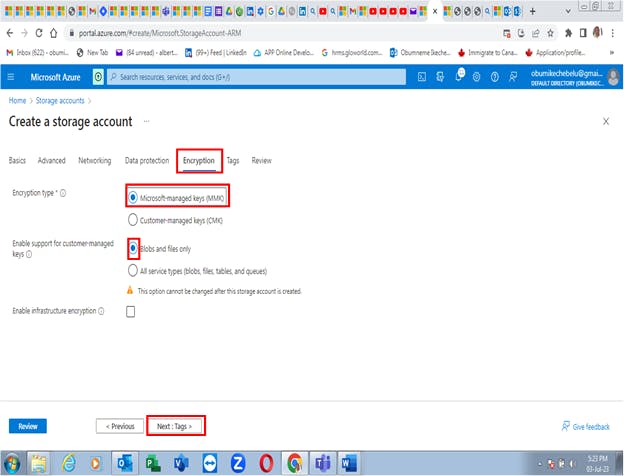
Click on “Next: Tags” to configure Tags Name, Value and Resource Type.
We can apply tags to your Azure resources giving metadata to logically organize them into a taxonomy. Each tag consists of a name and a value pair. After you apply tags, you can retrieve all the resources in your subscription with this tag name and value. It enables you to retrieve related resources from different resource groups.
- On the “Tags” page, Input Dept and ICT as name and value respectively.

SELECT REVIEW – RUN CHECK / VALIDATION OF ALL INPUT DATA.
Click on “Next: Review” for Configuration Validation.
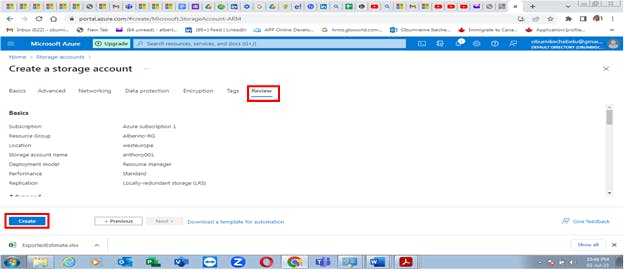
\Note*
Failed configuration validation will prompt you to the Error page for correction. Deployment of a storage account can only occur when the review/validation is successful.
Click on “Create” for Storage account Deployment after a successful Configuration Validation.
- Click Create for Deployment [wait for a while for a successful deployment message].

A storage account [anthony001] has been successfully deployed as you can view on the storage account menu. Go to the resource for Part 2 [create a Blob container] action to be implemented
Follow this link below for Azure storage account creation part 2.