

A Simplified Guide To Creating Azure Linux Virtual Machine Using Azure Cli.


WHAT IS A MICROSOFT AZURE LINUX VIRTUAL MACHINE?
Azure Linux Virtual Machines are virtualized computing resources provided by Microsoft Azure that run instances of the Linux operating system within the Azure cloud environment. These virtual machines allow you to deploy and manage Linux-based workloads without the need to set up and maintain physical hardware.
Azure Linux Virtual Machines are suitable for a wide range of scenarios, including web hosting, application development, running databases, content management systems, and more. They provide the flexibility and scalability of the Azure cloud environment while offering the familiarity of the Linux operating system. Whether you're a developer, IT administrator, or business owner, Azure Linux VMs allow you to create and manage Linux-based workloads in the cloud with ease.
What is Azure CLI?
The Azure Command-Line Interface [Azure CLI] is a set of commands used to manage and interact with resources in Microsoft Azure. It provides a command-line interface to manage various Azure services, including Virtual Machines, Storage, Networking, and more. The Azure CLI allows you to automate tasks, create and manage resources, deploy applications, and perform various administrative operations within your Azure environment, all through the command line.
Creating an Azure Linux Virtual Machine using the Azure CLI means using command-line commands provided by Azure's command-line interface (CLI) to provision and manage a virtual machine running a Linux operating system in the Azure cloud. This involves specifying parameters such as VM size, image, networking configurations, and authentication details to create and control the VM from the command line.
A more detailed practical approach to creating Azure Linux Virtual Machine Using Azure CLI is well explained below as we cover these key vital steps. [Let’s navigate].
1). Create a Resource Group.
2). Create a Linux Virtual machine [administratiopn-authentication type-password].
3). Connect to the created Linux virtual machine using Azure Cloud Shell [Azure CLI].
4). Install Azure CLI on the Linux Virtual Machine.
5). Mange Linux Virtual Machine – Run key commands.
Let’s dwell on the basic prerequisite needed first before going through the steps listed above for the creation of an Azure Linux Virtual Machine Using Azure CLI.
PREREQUISTIE
Your PC with online access.
Microsoft Azure account - If you don't have an Azure paid subscription, create a Free Account before you begin.
Download and Install Azure CLI version 2.51.0 on Windows on your PC.
32-bit MSI Windows PC, https://azcliprod.blob.core.windows.net/msi/azure-cli-2.51.0.msi.
64-bit MSI Windows PC, https://azcliprod.blob.core.windows.net/msi/azure-cli-2.51.0-x64.msi.
Follow the below steps to create an Azure Linux Virtual Machine using Azure CLI.
STEP 1: LOGIN TO AZURE USING AZURE CLI.
Login to your local machine [PC].
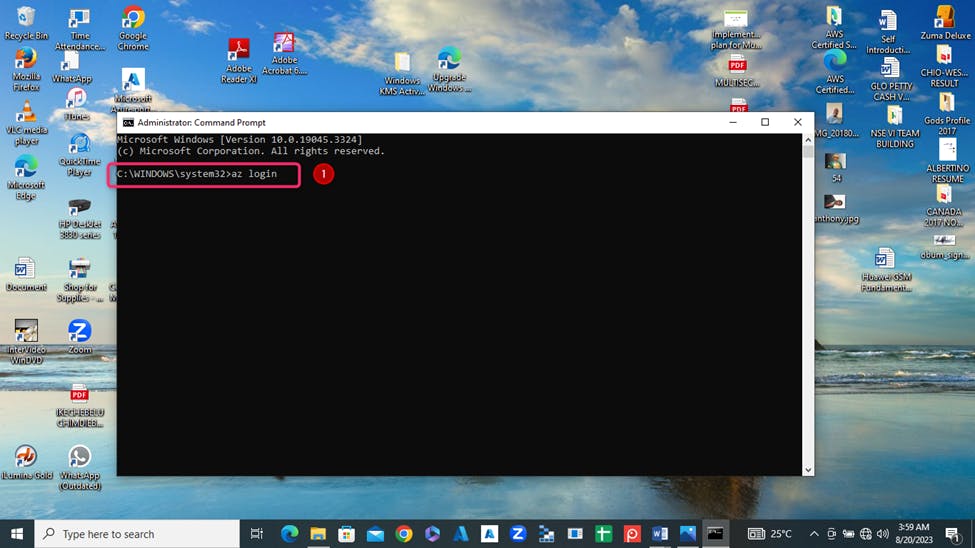
1). Launch your local machine [PC] Power Shell as administrator and run the “az login” to connect to your Azure [a Password will be requested for access/confirmation].
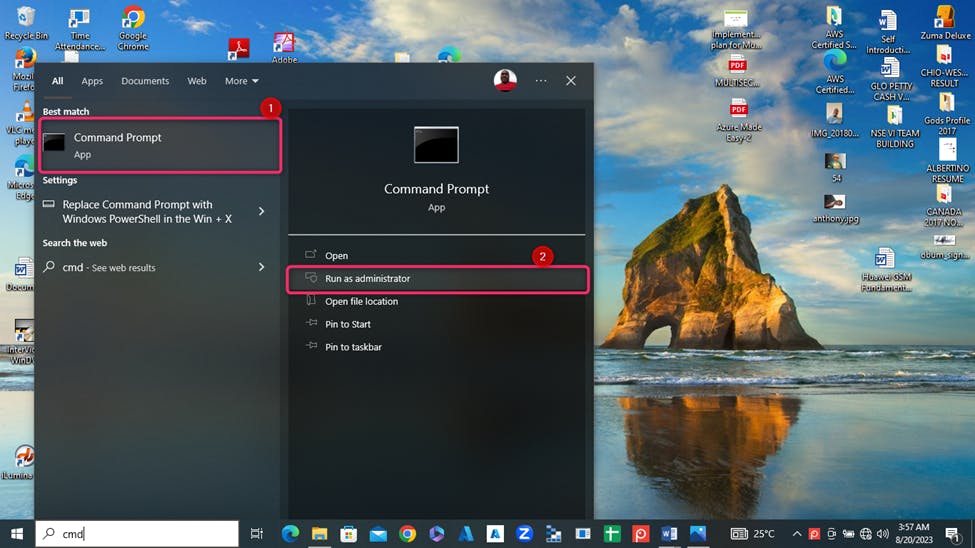
2). On your local machine [PC] Power Shell, input the command “az login”
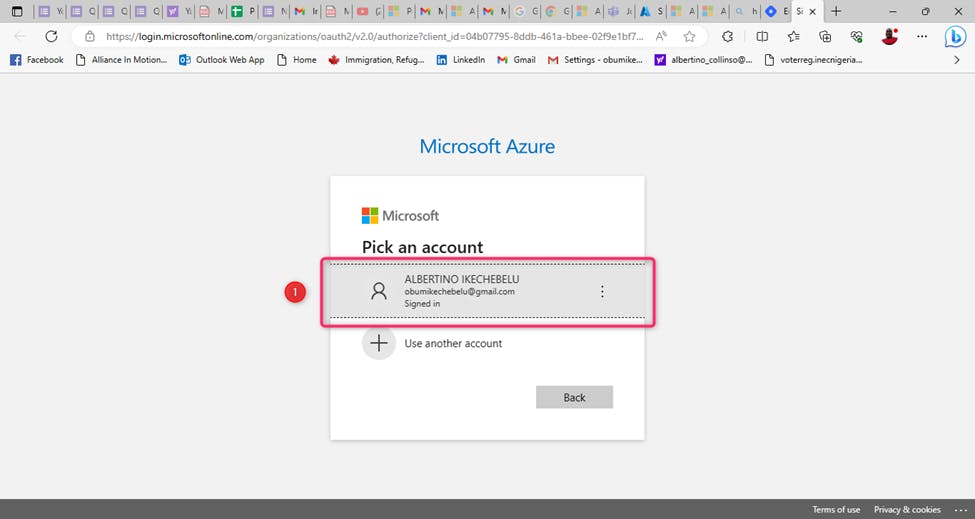
3). You will be redirected to your windows browser Azure portal for authentication.
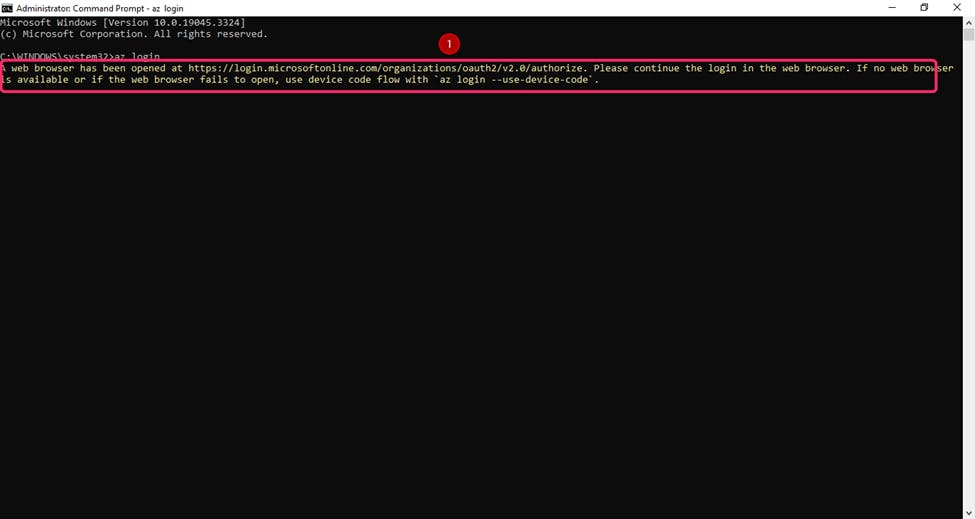
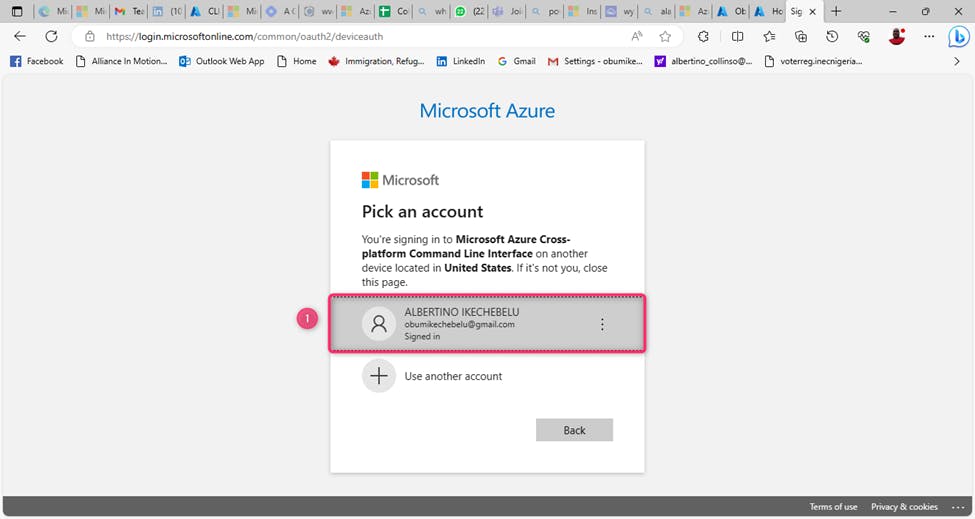
4). Authentication request for you to select the Azure account for connection. Select the right Azure account.
5). Azure account successfully granted [Do not close this window in order to proceed with VM connection]. Go back to your local machine [PC] Power Shell to run further commands to connect to the VM.
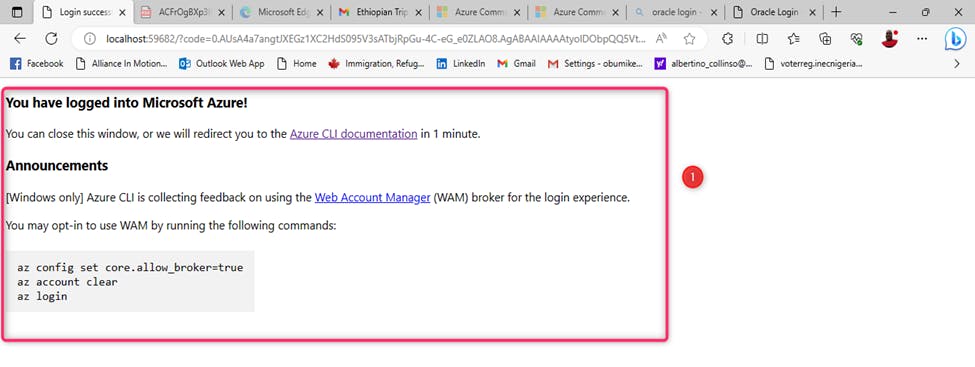
6). Your Local machine [PC] Power Shell is now connected to your Azure account and ready for further commands.

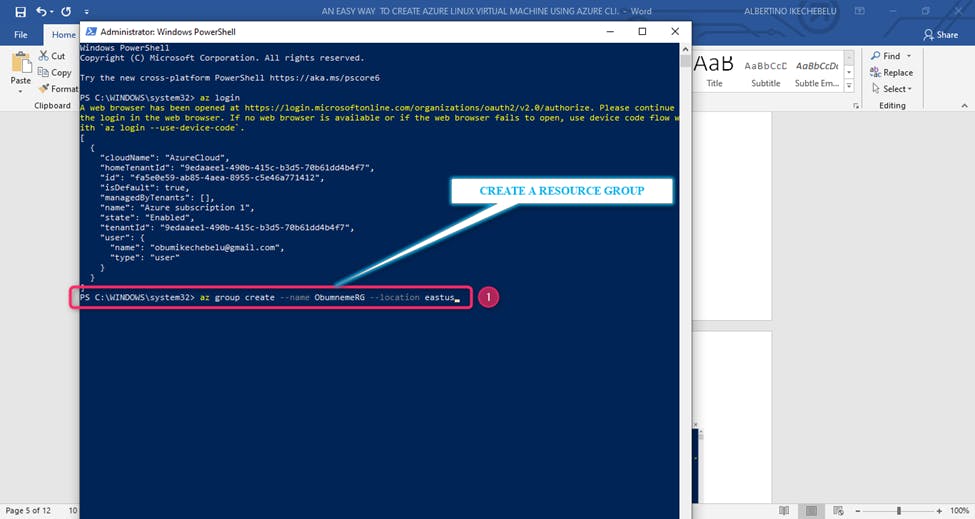
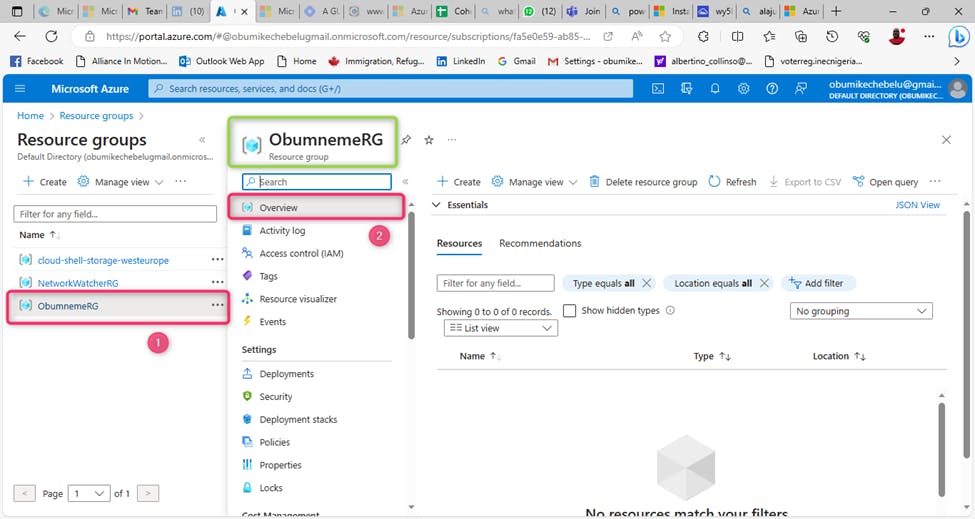
An Azure resource group is a logical container that holds related Azure resources for easier management, organization, and billing. Resources within a resource group are typically related to the same project, application, or environment. By grouping resources, you can manage them collectively, apply permissions, and track costs more effectively. This helps in organizing your resources and simplifying tasks such as deploying, monitoring, and securing your Azure infrastructure.
Firstly, let's create your resource group that will accommodate your Linux Virtual Machine.
1). Run this command:
az group create --name ObumnemeRG --location eastus
NOTE
A). Ensure to leave a space after each word.
B). Once you've inputted the command, Press enter.
A.
B.
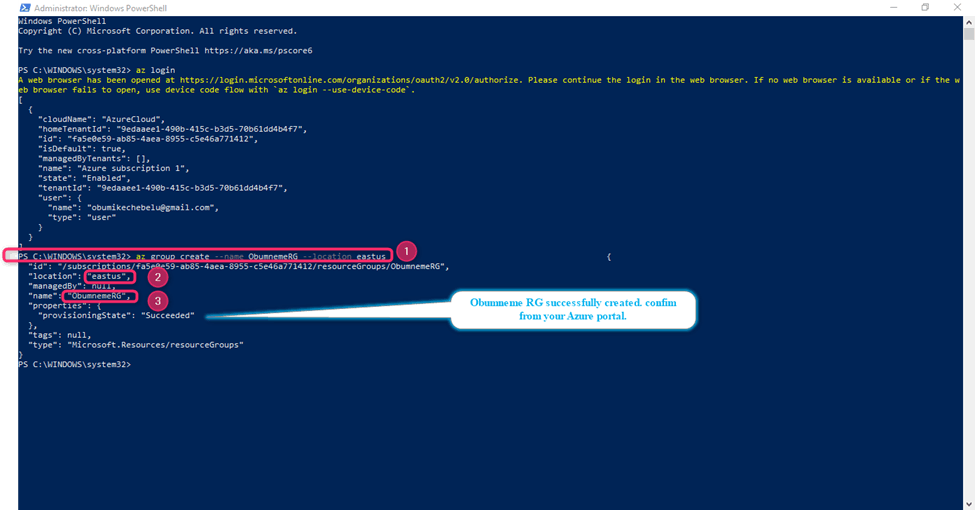
C.
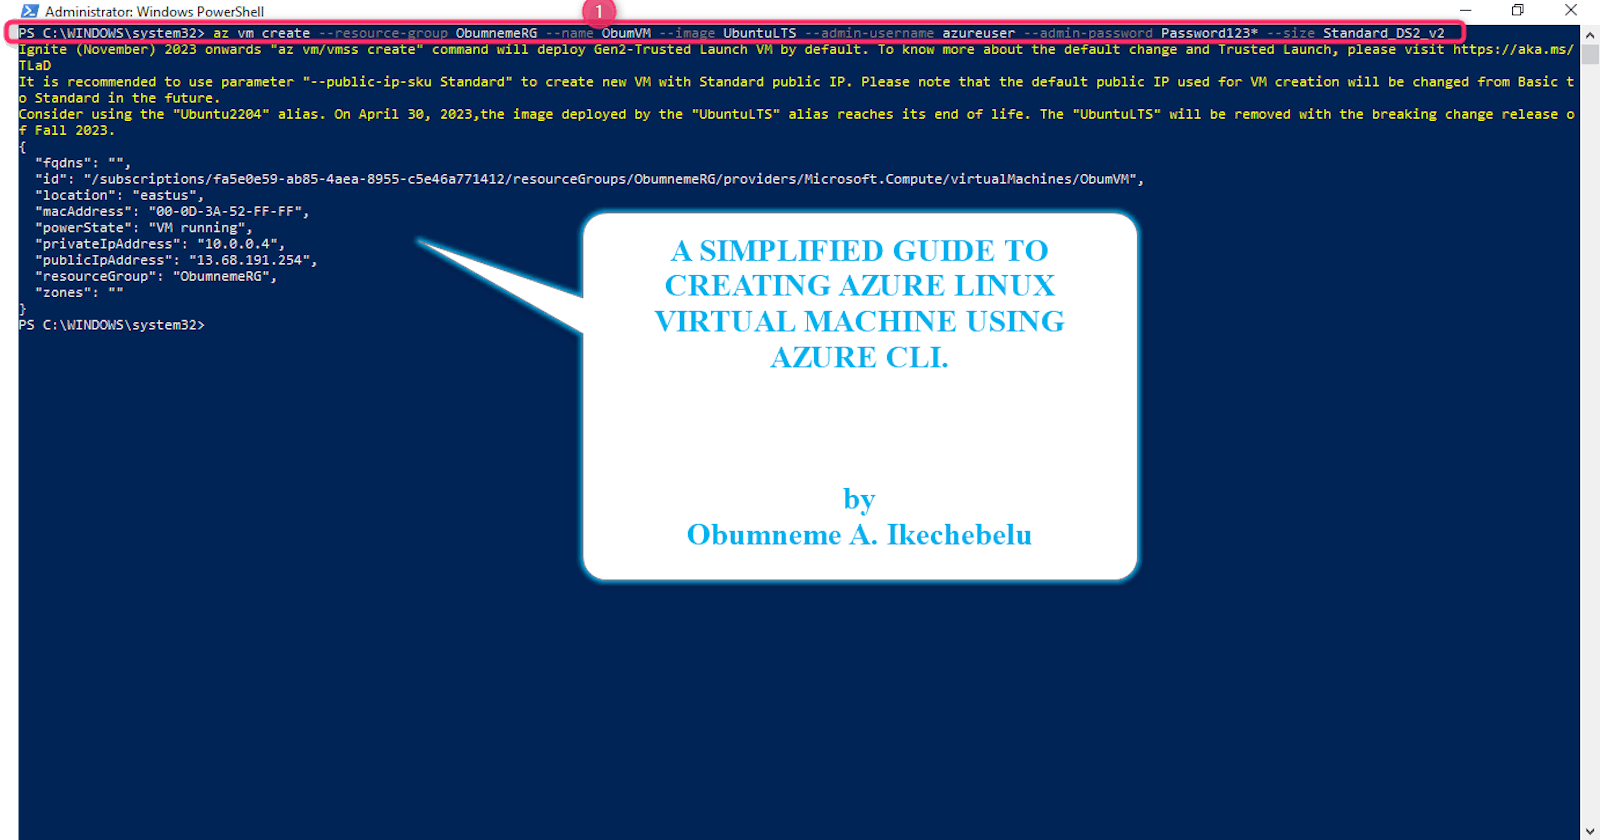
STEP 3: CREATE AZURE LINUX VIRTUAL MACHINE.
The next step is to create your Azure Linux Virtual Machine, which can be termed an operating system that hosts your web application. It provides the infrastructure and resources needed to run and scale your apps
1). Run this command:
az vm create --resource-group MyResourceGroup --name MyVM --image UbuntuLTS --admin-username azureuser --admin-password MyPassword123 --authentication-type password --size Standard_DS2_v2
az vm create --resource-group ObumnemeRG --name ObumVM --image UbuntuLTS --admin-username azureuser --admin-password Password123* --size Standard_DS2_v2
A.

B.
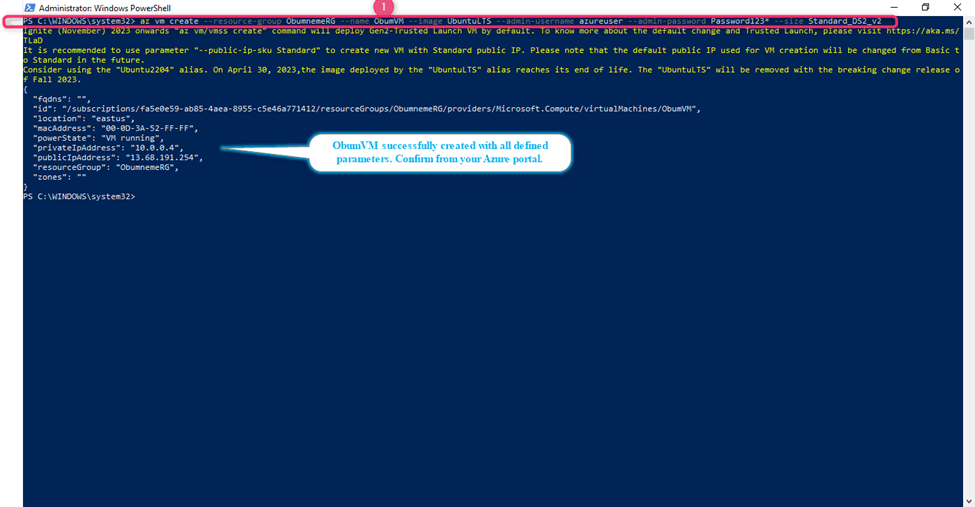
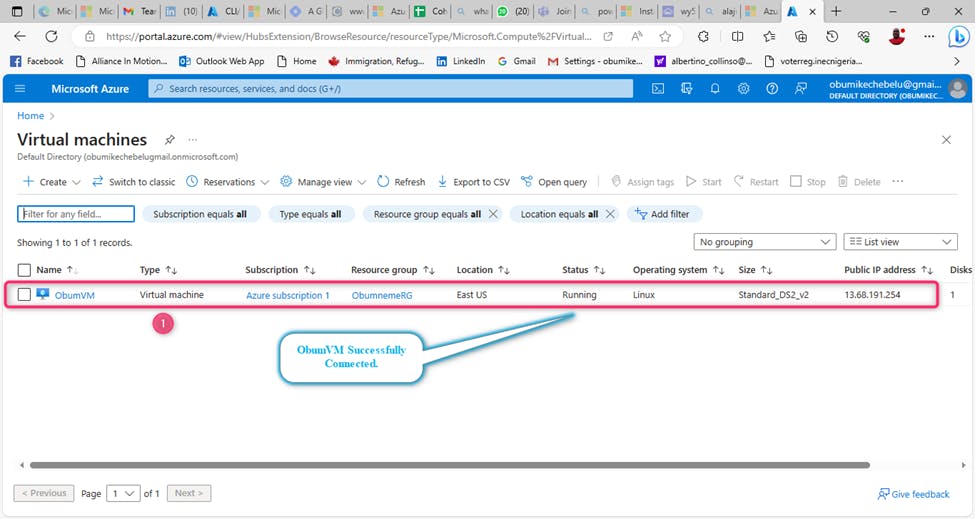
C. ObumVM successfully created. Verify on your Azure portal.

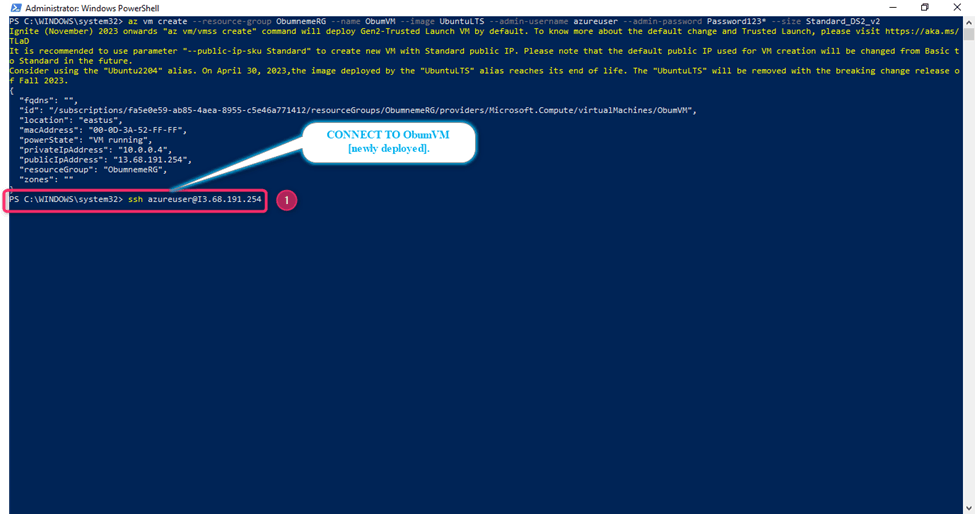
STEP 4: CONNECT TO AZURE LINUX VIRTUAL MACHINE.
Once the Azure Linux Virtual Machine has been created and deployed successfully, Then, we can now connect to the Linux Virtual Machine for more management activities.
On your AZURE PORTAL, navigate to the created VM through the overview and extract the VM Public IP address.
VM Public IP address: 13.68.191.254
1). Input the command: ssh username@ipaddress
ssh azureuser@I3.68.191.254
A. Run VM connect command.
B.

C. ObumVM successfully created. Verify on your Azure portal.
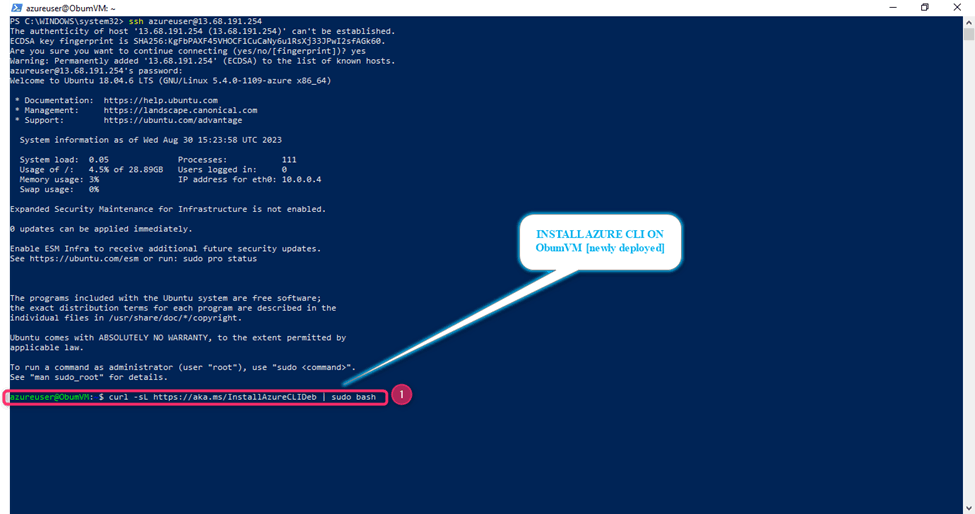
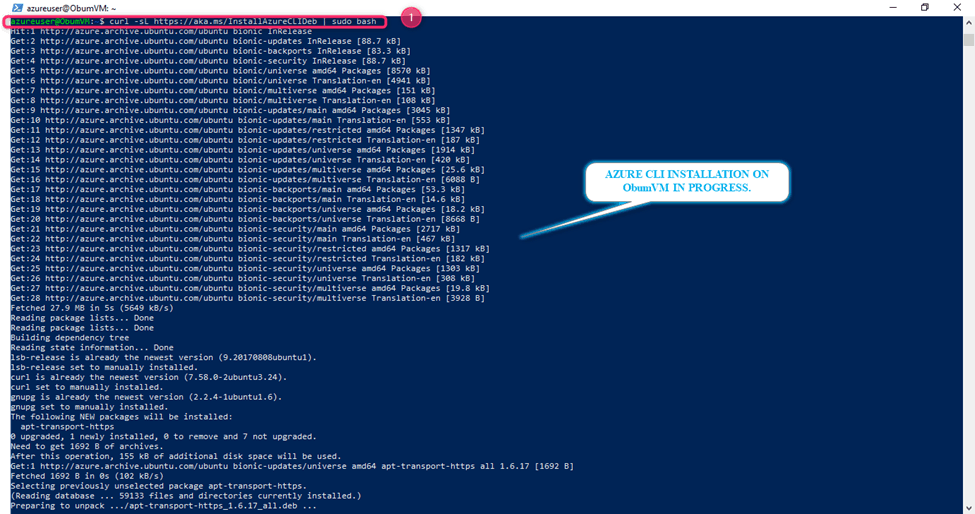
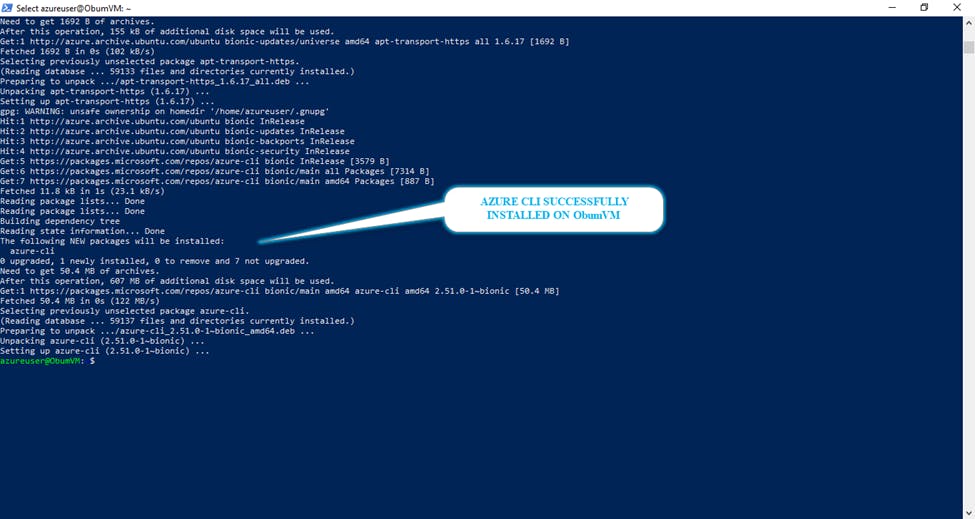
STEP 5: INSTALL AZURE CLI ON AZURE LINUX VIRTUAL MACHINE [newly deployed].
Once the Azure Linux Virtual Machine has been connected successfully, Then, we can now install the Azure CLI on the Linux Virtual Machine [newly deployed] for more management activities.
1). Input the command:
curl -sL https://aka.ms/installAzureCLIDeb | sudo bash
A. Run the Azure CLI command to install.
B.
C. Azure CLI successfully installed on ObumVM.
STEP 6: MANAGE AZURE LINUX VIRTUAL MACHINE [newly deployed] USING AZURE CLI.
Azure CLI has been installed successfully on the Azure Linux Virtual Machine, Then, we can now manage the VM via running certain Key commands on the VM.
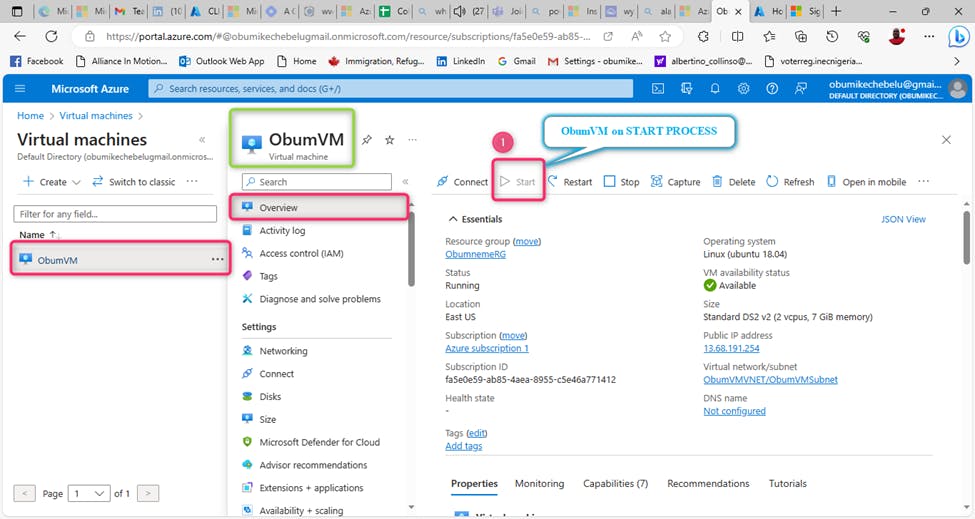
1). START VM
Input the command
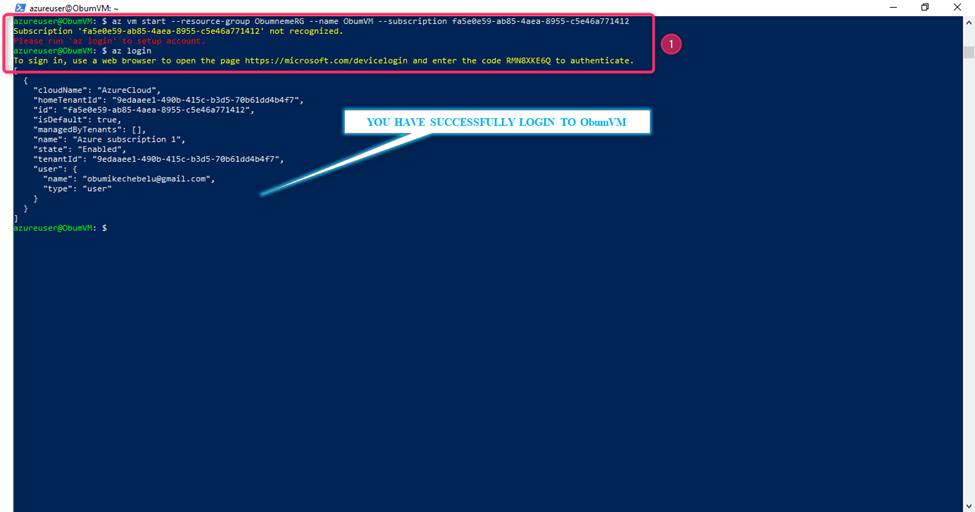
az vm start [--ids] [--name] [--no-wait] [--resource-group] [--subscription]
az vm start--resource-groupObumnemeRG--nameObumVM--subscriptionfa5e0e59-ab85-4aea-8955-c5e46a771412
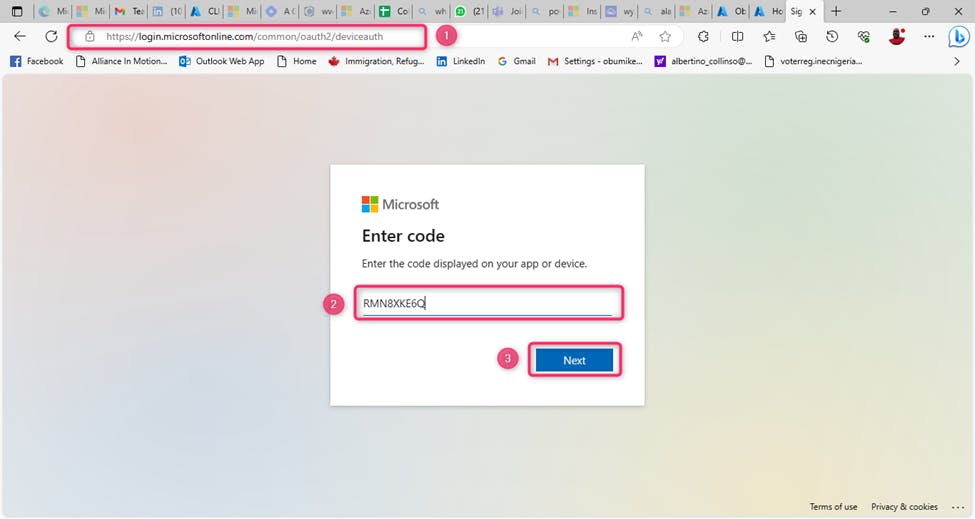
A. Input “az login” You will be redirected to log in through a browser with a URL link and authentication password generated from Azure. Confirmation prompt for continuity will be asked during the process.
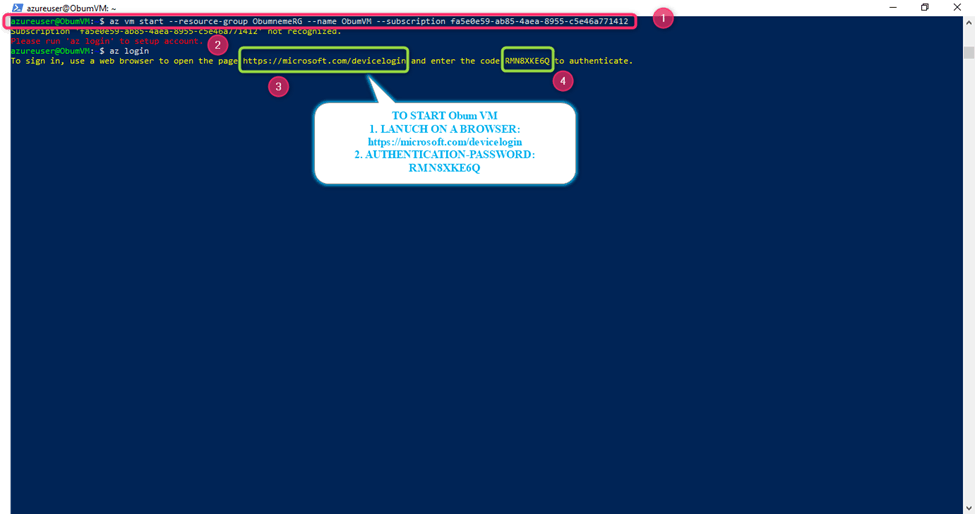
B. Launch the URL link on a browser and input the password to continue.
URL: https://microsoft.com/devicelogin
Password: RMN8XKE6Q
C . Authenticate with your Microsoft Azure account login detail.
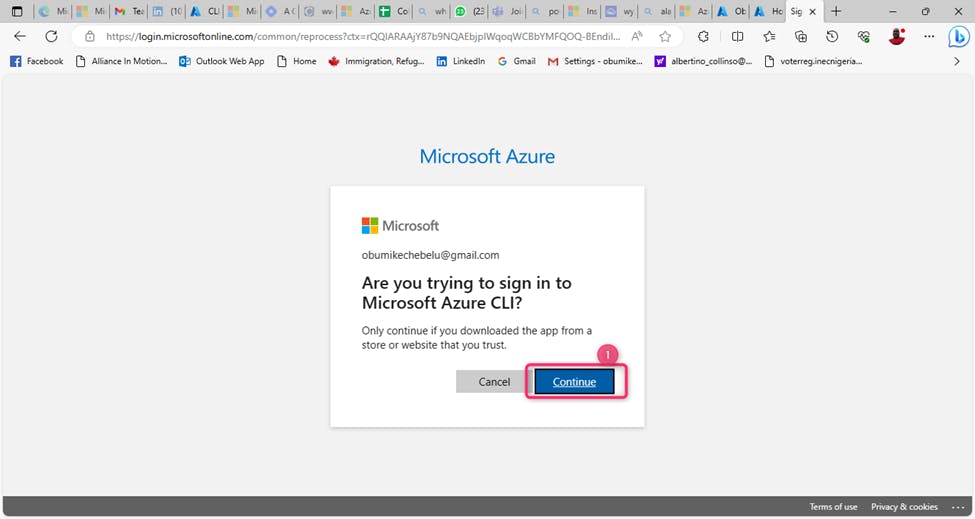
D. Confirm to continue ObumVM start process.
E. Confirmation for a successful ObumVM Start. Do not close this page and go to your local machine [PC] Power Shell page to confirm.
F. ObumVM start Confirmation from Azure portal.
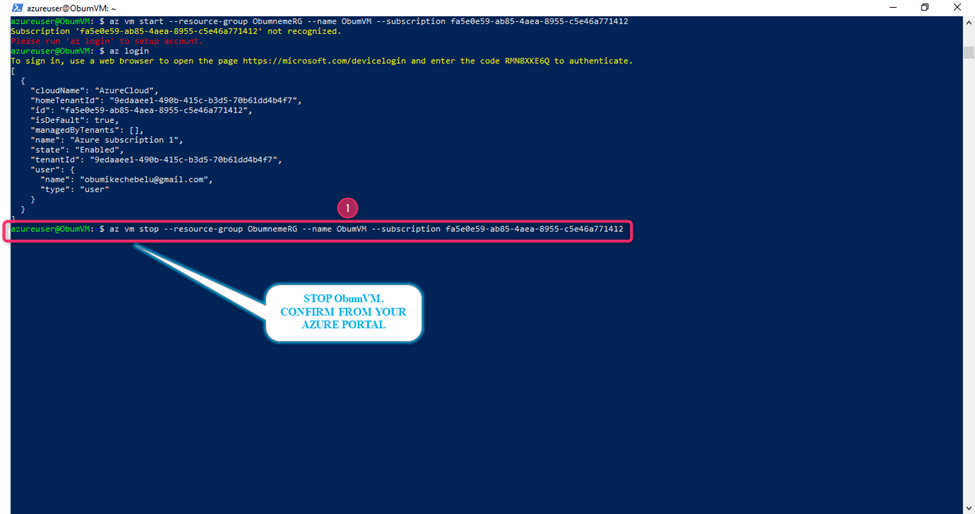
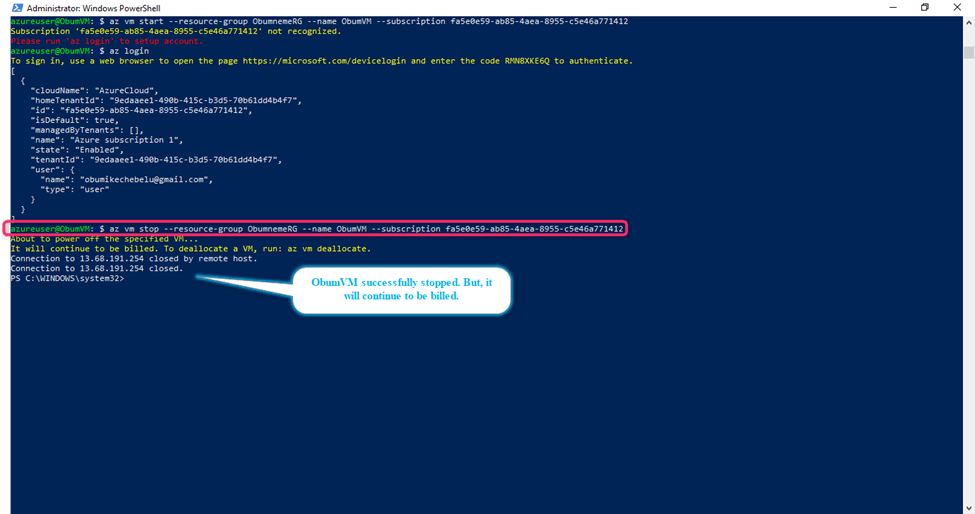
2). STOP VM.
az vm stop [--ids] [--name] [--no-wait] [--resource-group] [--skip-shutdown] [--subscription]
az vm stop --resource-group ObumnemeRG --name ObumVM --subscription fa5e0e59-ab85-4aea-8955-c5e46a771412
A. Run the VM stop.
B. ObumVM successfully stopped. It will continue to be billed.
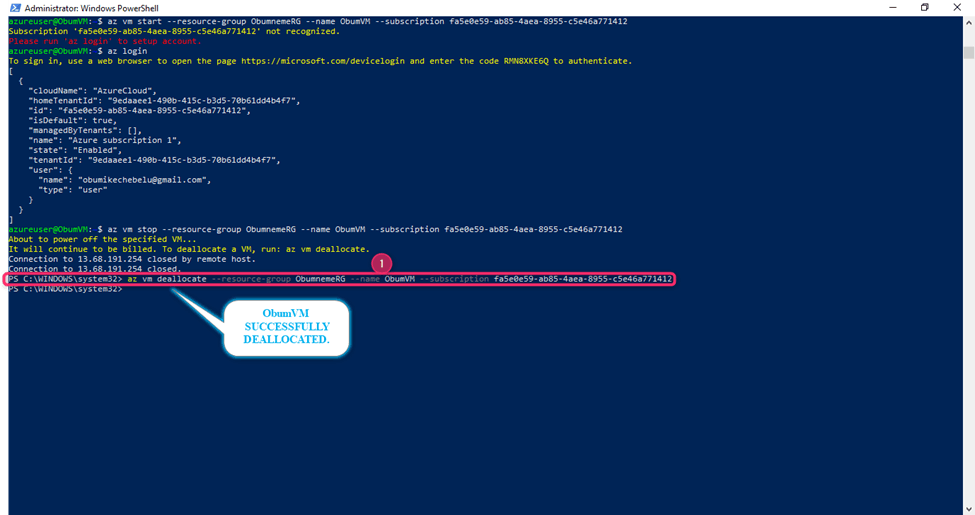
3). DEALLOCATE VM
az vm deallocate [--hibernate] [--ids] [--name] [--no-wait] [--resource-group] [--subscription]
az vm deallocate --resource-group ObumnemeRG --name ObumVM --subscription fa5e0e59-ab85-4aea-8955-c5e46a771412
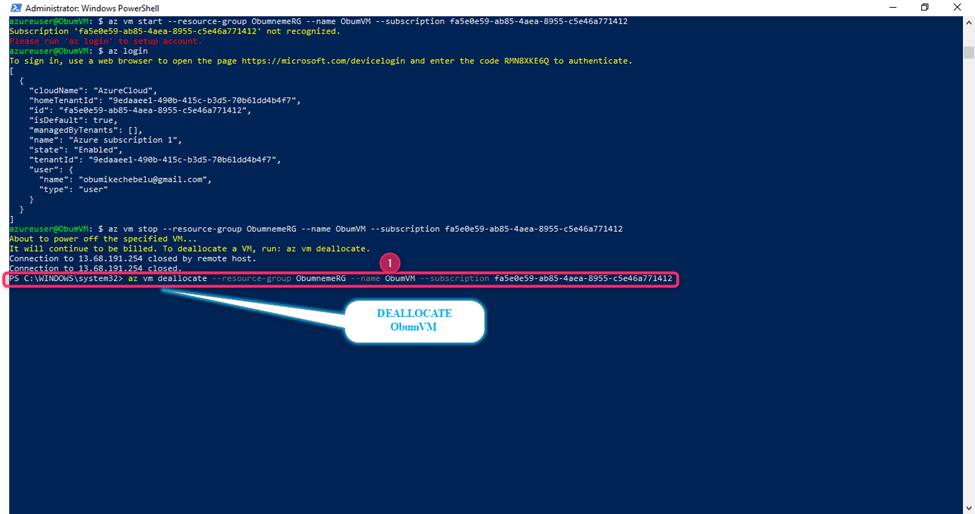
B. ObumVM successfully deallocated.
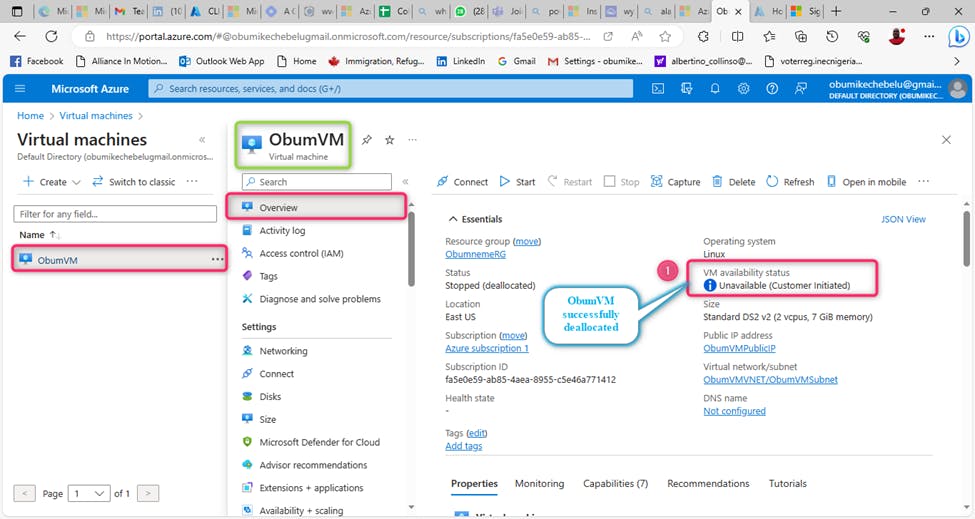
C. ObumVM Deallocation confirmation from Azure portal.
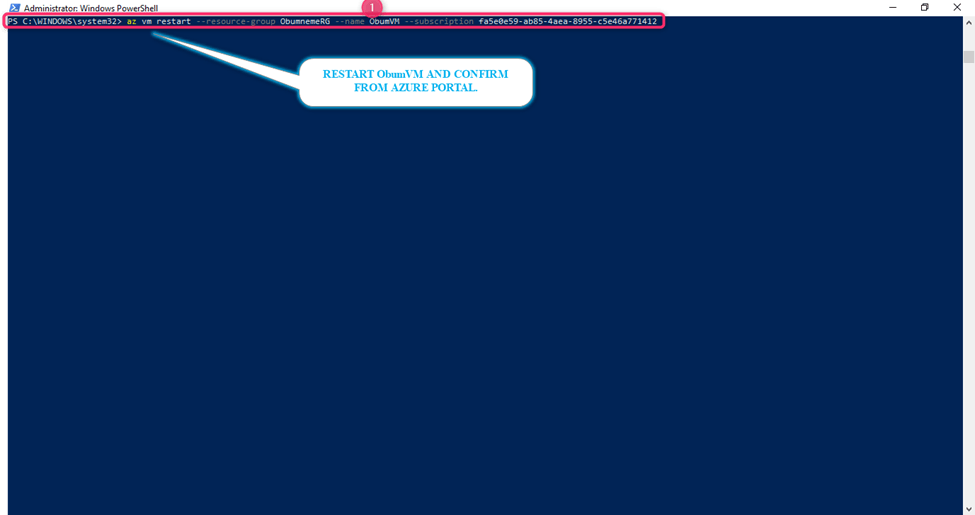
4). RESTART VM.
az vm restart [--force] [--ids] [--name] [--no-wait] [--resource-group] [--subscription]
az vm restart --resource-group ObumnemeRG --name ObumVM --subscription fa5e0e59-ab85-4aea-8955-c5e46a771412
NOTE
ObumVM must be running/available for you to restart the VM.
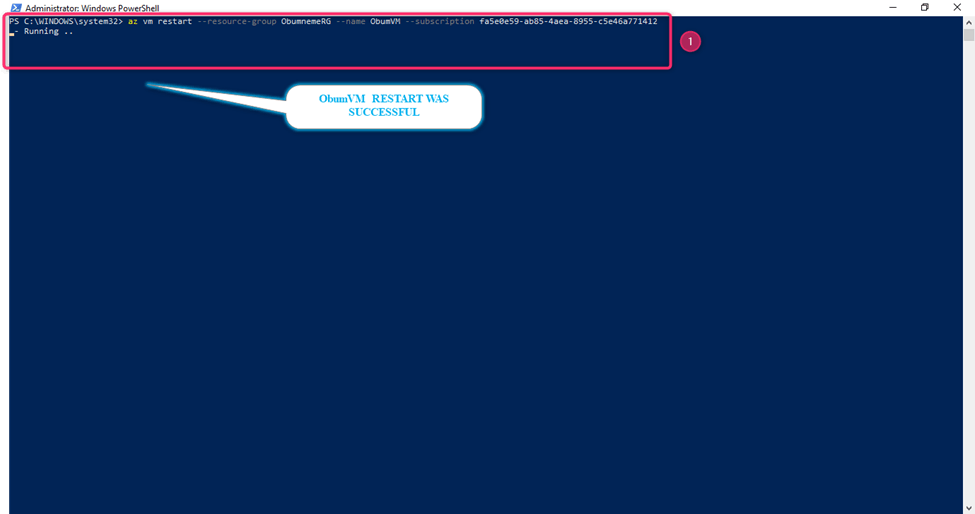
A. Run the VM Restart
B. ObumVM Restart was successful
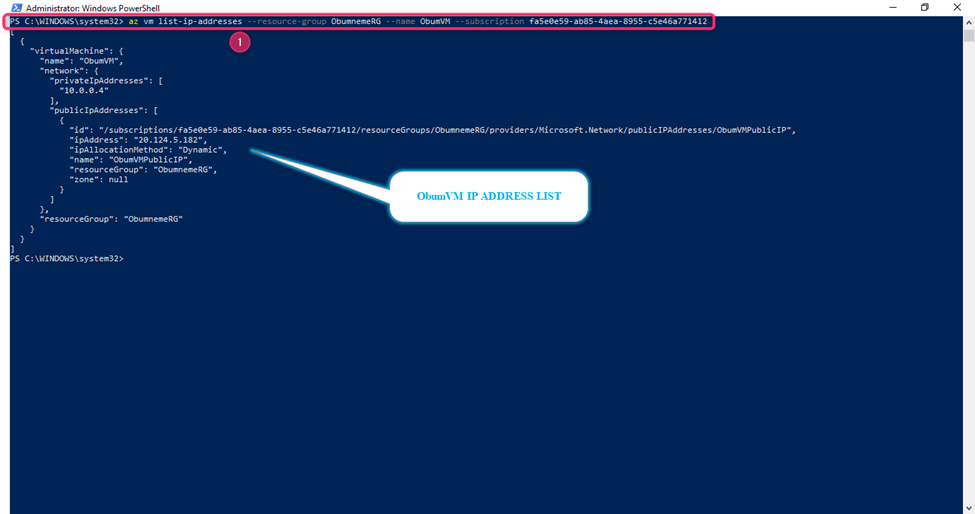
5). VM IP ADDRESS LIST
az vm list-ip-addresses [--ids] [--name] [--resource-group] [--subscription]
az vm list-ip-addresses --resource-group ObumnemeRG --name ObumVM --subscription fa5e0e59-ab85-4aea-8955-c5e46a771412
6). VM MONITOR METRICS TRAIL
az vm monitor metrics tail [--name] [--resource-group] [--aggregation {Average, Count, Maximum, Minimum, Total}] [--dimension] [--end-time] [--filter] [--interval] [--metadata] [--metrics] [--namespace] [--offset] [--orderby] [--start-time] [--subscription] [--top]
az vm monitor metric trail --resource-group ObumnemeRG --name ObumVM --subscripton fa5e0e59-ab85-4aea-8955-c6e46a771412
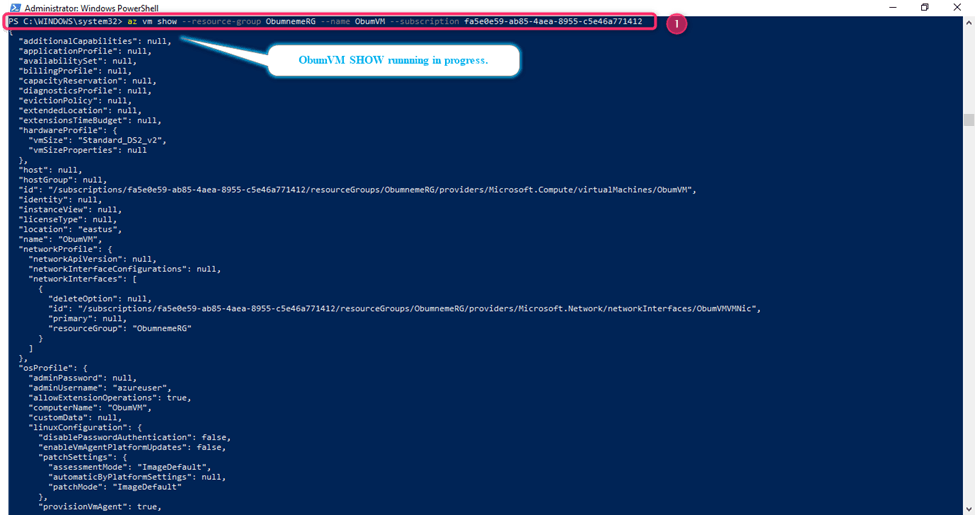
7). VM SHOW
az vm show [--ids] [--include-user-data] [--name] [--resource-group] [--show-details] [--subscription]
az vm show --resource-group ObumnemeRG --name ObumVM --subscription fa5e0e59-ab85-4aea-8955-c5e46a771412
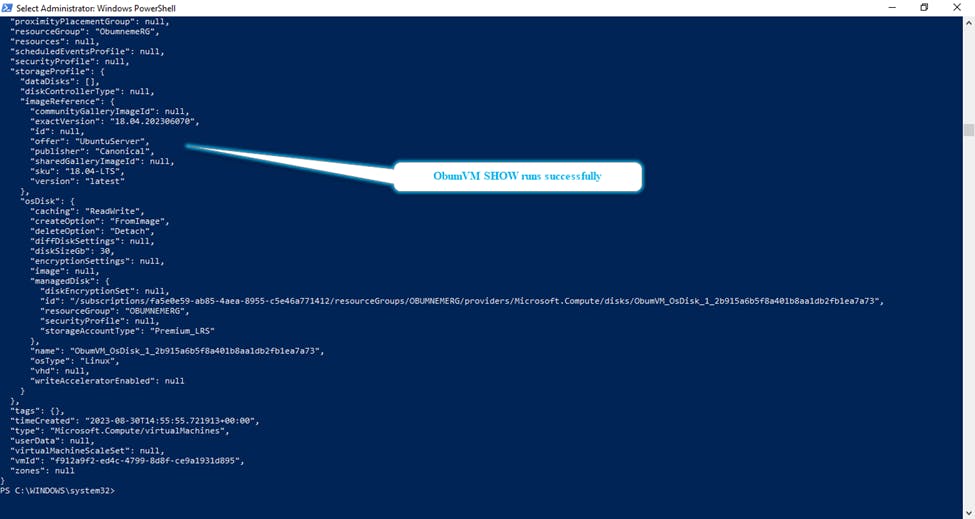
A. Run ObumVM SHOW command
B. ObumVM SHOW runs successfully.
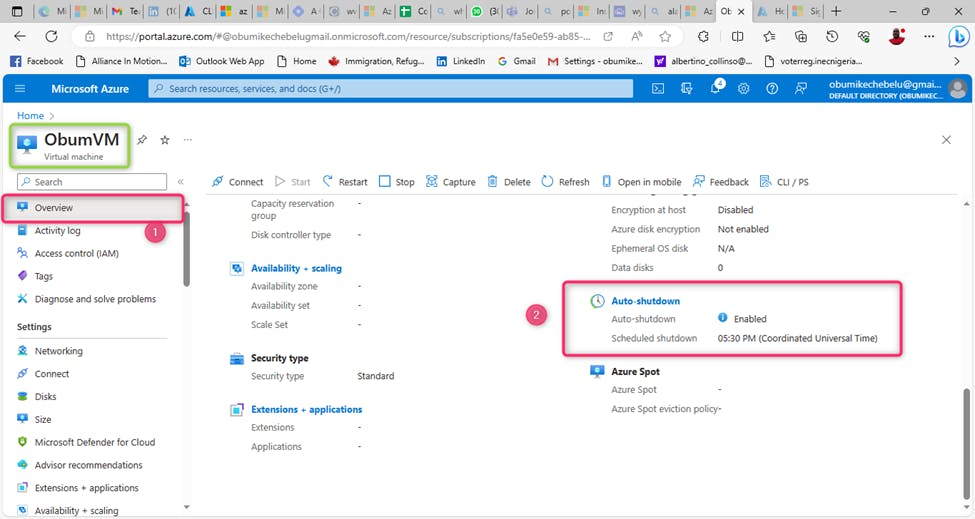
8). VM AUTO SHUTDOWM
az vm auto-shutdown [--email] [--ids] [--location] [--name] [--off] [--resource-group] [--subscription] [--time] [--webhook]
az vm auto-shutdown --resource-group ObumnemeRG --name ObumVM --time 1730 --subscription fa5e0e59-ab85-4aea-8955-c5e46a771412 NOTE*
VM shutdown time must be specified.
A. Run Auto shutdown command.
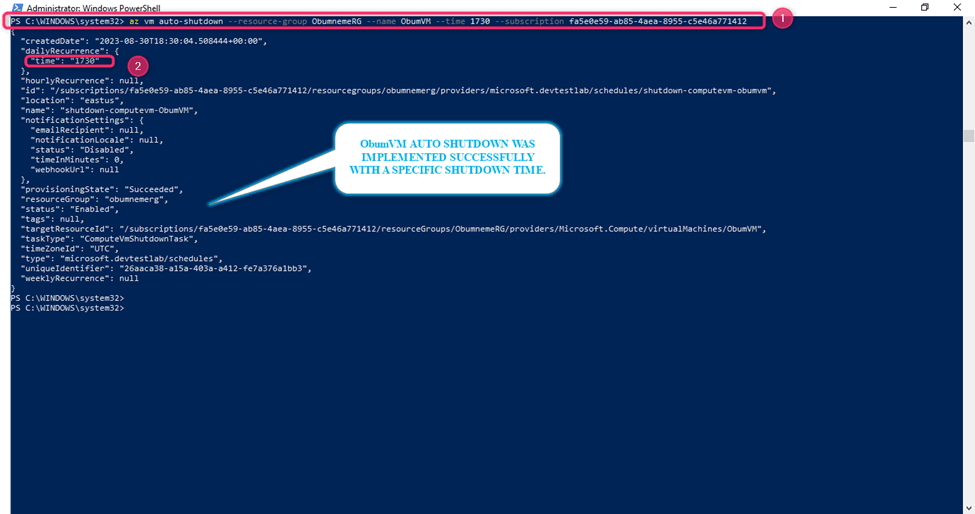
B. ObumVM auto shutdown was implemented successfully with a shutdown time factor
9). VM DELETE
az vm delete [--force] [--ids] [--name] [--no-wait] [--resource-group] [--subscription]
az vm delete --resource-group ObumnemeRG --name ObumVM --subscription fa5e0e59-ab85-4aea-8955-c5e46a771412
A. Run VM delete command.
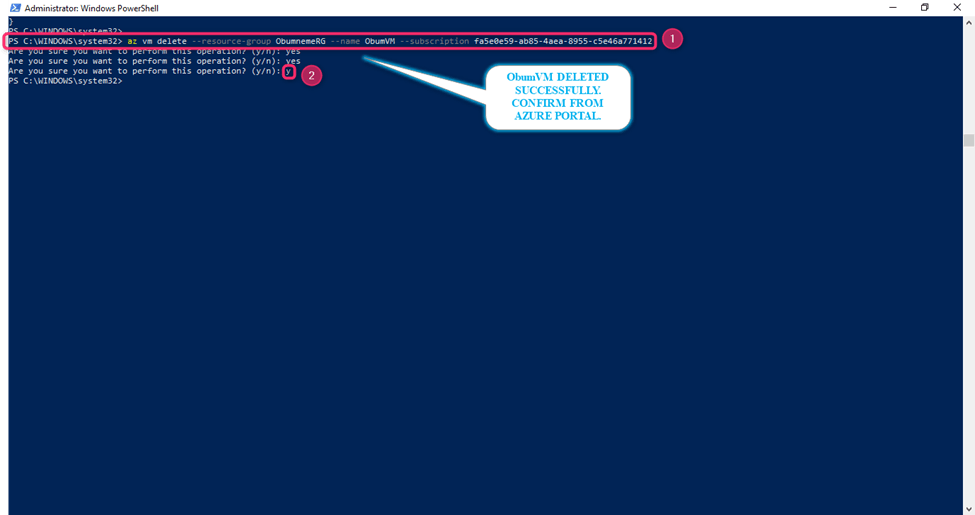
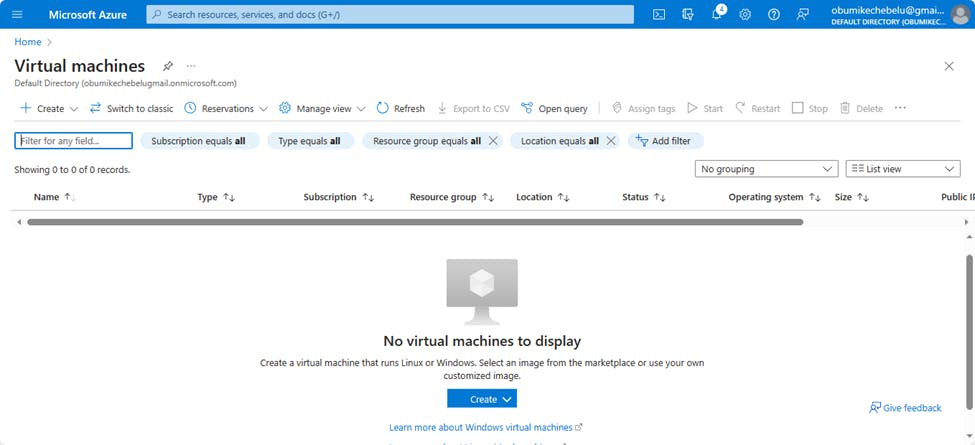
B. ObumVM deleted successfully.

C.
Furthermore, there are lots of Azure CLI commands to lay your hands for more practice.
SUMMARY:
We were able to successfully explore the following Azure Cloud journey and I am confident that you can navigate on your own through the above guide made easy in the areas below;
1). Create a Resource Group.
2). Create a Linux Virtual machine [administration -authentication type-password].
3). Connect to the created Linux virtual machine using Azure Cloud Shell [Azure CLI].
4). Install Azure CLI on the Linux Virtual Machine.
5). Mange Linux Virtual Machine – Run key commands.
Thank You!...